
Astralis External
This is a guide for Astralis External.
If you'd like to purchase it, you can do so from this link: Buy Now.
!Important!
If you are using external spoofer. Always run the cheat first and then the spoofer. If you run the spoofer first and then the cheat, you will get banned.
External
External products are better for undetection
Be careful
Product does not have spoofer. This means if you got banned you will get hwid banned.
You can purchase External Spoofer
If you want to purchase spoofer, you can do so from this link: Buy Now.
Operating System
We support Windows 10 (version 21H1 and above) and Windows 11 (all official builds listed below).
How to check your Windows version: Press the Windows key, type
winver, and press Enter.
Supported Windows Versions
Windows 10 — Version 21H1
Windows 10 — Version 22H2
Windows 11 — Version 21H2
Windows 11 — Version 22H2
Windows 11 — Version 23H2
Windows 11 — Version 24H2
Windows 11 — Version 25H2
warning
We do not guarantee proper operation on unofficial or modified Windows builds. If Hyper-V, EFI, or Boot Manager components are removed, the product may fail to start.
Processor
Any Intel or AMD processor is supported.
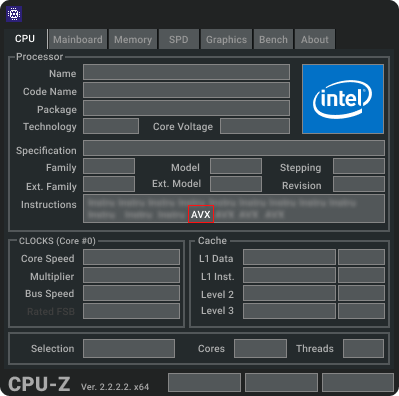
Must have AVX instruction set support.
How to check AVX support: Download CPU-Z and run it. In the instruction list, look for "AVX".
BIOS Mode
Only UEFI BIOS mode is supported.
How to check BIOS mode: Press Windows key, type
msinfo32, and press Enter. Look for BIOS Mode — it must say UEFI.
warning
If it says Legacy, you need to switch to UEFI mode. See the BIOS mode change video for instructions.
Required Files
Download all required files before starting:
Product Launch Instructions
danger
Close any running game or game launcher before starting the product.
Step 1 — Download & Run the Downloader
The file will have a
.comor.exeextension.The downloader runs with administrator privileges by default.
Step 2 — Enter Your Key & Activate
After launching the downloader, enter your key and click Activate.
Step 3 — Run the Product
Click Run after logging in.
danger
Do not interrupt the startup process until your desktop is fully loaded. Interruptions can damage your boot partition and prevent Windows from loading.
After the countdown, your PC will reboot and display the product logo instead of the motherboard logo.
Step 4 — Launch Your Game
Once on your desktop, start the game.
The product menu should appear within one minute.
Hotkeys
Full Version:
HOME - Open/close menu (can be remapped).
END - Unload product (menu can only be restored by restarting).
Loader errors
Errors when trying to open the loader
System Error
The program can't start because MSVCP140.dll is missing from your computer. Try reinstalling the program to fix this problem.
This error means that you are missing Microsoft Visual C++ base libraries
Note: Microsoft Visual C++ libraries must be installed
Error .Net Framework
Unhandled exception has occurred in your application. If you click Continue, the application will ignore this error and attempt to continue. If you click Quit, the application will close immediately. The handle is invalid.
This error means that you are missing the .Net Framework base libraries
Note: You need to install the .Net Framework libraries
Errors when trying to open the loader
Error: hvix64/hvax64 not found! -> 7h
This error means that you don't have enough Windows hvix64 files if it's Intel, hvax64 if it's AMD.
Note It is necessary to restore Windows system files using the commands below
Open the command prompt as an administrator and enter this command:
We wait until the end of the download, then enter the following command
After downloading, the PC restarts and we launch the product according to the instructions
Errors during authorisation
Old Windows! Need Win10 21H1 b19043
This error means that you do not have the correct Windows or version.
Note: A suitable Windows and version must be installed
TPM Enabled!
This error means that you have Trusted Platform Module (TMP) enabled
Note: You need to disable Trusted Platform Module (TMP) in the system bios
No VMX support!
This error means that you have Virtualisation Technology (VMX) turned off
Note: You need to enable Virtualisation Technology (VMX) in the system bios
Video tutorial on how to enable Virtualisation Technology (VMX)
No AVX support!
This error means that you have a broken or unsupported AVX processor instruction
Need to replace the processor with an Intel from 5th generation with AVX support.
You can find out if your processor supports AVX here
Astralis Cheat Overlay Not Displaying
Fix:
Ensure all overlays (Discord, Steam, NVIDIA, etc.) are disabled.
Double-check all keybinds are correctly set.
If the cheat works but stops displaying after ~20 minutes, the issue is likely with conflicts.
SteelSeries software causes overlay conflicts — disable or uninstall it.
Restart your PC and try again.
Below is your guide rewritten in clean, well-structured Markdown, in English, preserving all sections, notes, and formatting style.
Loading 0 Error: Wrong boot part size! -> 6h
Need change size bootpart or clear reinstall:
Recovering a Boot Partition
1. Insert a Bootable USB Drive
Insert a bootable USB flash drive with Windows installation files formatted in FAT32.
Info You can create the USB on another device.

2. Enter BIOS and Boot from USB
Open your BIOS/UEFI and select the USB drive as the boot device.


3. Windows Setup Screen
After booting, you will see the Windows Setup window.


Danger Do not proceed with Windows installation — we only need Command Prompt.
4. Open Command Prompt
On the Windows Setup screen, press:
SHIFT + F10
A Command Prompt window will appear.
5. Use DiskPart
Open DiskPart
Info DiskPart is a utility for managing disks and partitions.
List Volumes
Info A list of all volumes will appear. Identify the EFI boot partition:
Size: ~100 MB
File System: FAT32
Label: SYSTEM, EFI, or blank
Usually no drive letter
Select the EFI Volume
Info Replace
5with the actual number of your EFI volume.
Format the EFI Partition
Info Performs a quick FAT32 format and clears the partition.
Assign a Drive Letter
Info Assigns the EFI partition the temporary letter
Z:.
Exit DiskPart
6. Rebuild the Bootloader
Type:
Info
C:\Windows→ path to your Windows installation
/s Z:→ target EFI partition
/f all→ creates boot files for both UEFI and BIOS systems
If successful, you will see:
Example Result


7. Finish
Shut down your computer, remove the USB drive, and turn it on again.
Success Done! You have successfully restored the Windows boot partition.
Last updated
Was this helpful?